
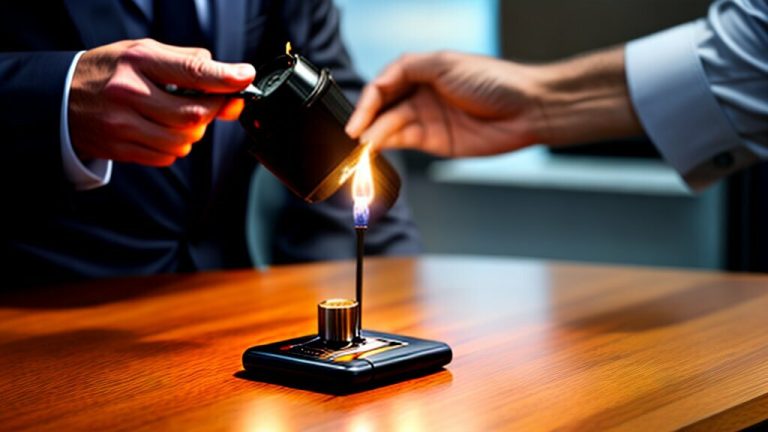
This blog post will help you to provide complete useful guide about “How to Fix a Torch Lighter That Won’t Click”. You can try several easy fixes before giving up on it completely. In this section, we will provide expert tips and solutions to help you troubleshoot and resolve the issue of a torch lighter that won’t click.
Whether you’re looking for tips to troubleshoot your torch lighter or need guidance on how to repair it, we’ve got you covered. From checking the fuel level to adjusting the flame height, we will guide you through fixing the problem and ensuring that your torch lighter is back in working condition using a car cigarette lighter.
Key Takeaways on How to Fix a Torch Lighter That Won’t Click :
- You can try several easy fixes for a torch lighter that won’t click.
- Troubleshoot common issues such as a torch lighter not igniting or sparking.
- Check the fuel level, clean the igniter, adjust the flame height, and address other mechanical issues.
Troubleshoot Torch Lighter Issues
When your lighter won’t ignite, a few common issues may be the root cause of the problem. Before attempting any repairs, it’s important to troubleshoot the lighter to identify the issue.
Here are some steps to help you troubleshoot a torch lighter that won’t spark:
- Check the fuel level in your lighter. If the lighter is out of fuel, it won’t ignite. Refill or replace the fuel to ensure the lighter has enough fuel to produce a flame.
- Clean the igniter. Dirt or debris can prevent the igniter from functioning properly. Use a soft-bristled brush to clean the igniter and ensure it is debris-free.
If the above steps didn’t fix the problem, try adjusting the flame height. Adjusting the flame height can help resolve issues with a torch lighter not sparking. Refer to the manufacturer’s instructions for guidance on adjusting the flame height.
Another common issue is a problem with the butane flow. If the butane is not flowing properly, it may prevent the lighter from sparking. Troubleshoot the butane flow to ensure it is working correctly.
If none of the above steps resolve the issue, it may be necessary to replace the igniter. Refer to the manufacturer’s instructions for guidance on how to replace the igniter.
Troubleshoot Torch Lighter Issues with Specific Symptoms
Depending on the specific symptoms of your lighter, there may be different troubleshooting steps to follow.
If your torch lighter won’t ignite, check the fuel level and try cleaning the igniter. If these steps don’t work, there may be a gas leak or other mechanical issue. Consult the manufacturer’s instructions or seek professional assistance to address these issues.
If your torch lighter is sparking but won’t produce a flame, there’s likely a problem with the fuel flow. Check the fuel level and troubleshoot the butane flow to resolve the issue.
Check the Fuel Level of Torch Lighter
When troubleshooting a torch lighter that won’t produce a flame, one of the first things to check is the fuel level. The torch lighter won’t function properly without enough fuel and may not click or ignite.
First, turn off the torch lighter to check the fuel level and allow it to cool down. Then, locate the fuel adjustment screw or valve and turn it counterclockwise until it stops. This will release any remaining pressure in the lighter.
Next, hold the lighter upside down and remove the fuel chamber from the torch. Hold the fuel chamber up to the light to check the fuel level. If the fuel level is low or empty, it’s time to refill or replace the fuel in the lighter.
To refill the lighter, use a butane fuel canister designed for torch lighters and insert the nozzle into the fuel chamber. Press down and hold the canister until the fuel chamber is full. Once full, allow the fuel to settle for a minute before using the lighter.
Alternatively, if the fuel chamber is damaged or the fuel level is consistently low, it’s time to replace the fuel chamber. Look for a replacement part that is compatible with your torch lighter model.
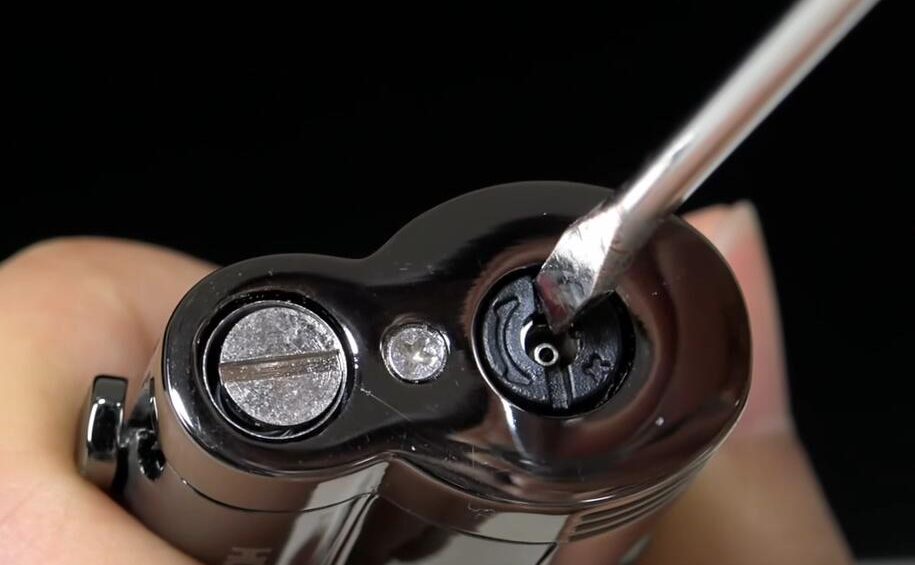
Clean the Igniter
Keeping the igniter clean is essential for properly functioning your torch lighter. Over time, dirt and debris can accumulate on the igniter, hindering its ability to spark properly. Here are the steps to clean the igniter:
- Turn off the torch lighter and detach it from the fuel source.
- Remove any visible debris or dirt on the igniter using a small tool such as a toothpick or needle.
- Take a dry cloth and gently wipe the igniter until it is completely clean.
If the above steps do not resolve the issue, you may need to disassemble the torch lighter and thoroughly clean the igniter. Use caution when disassembling and reassembling the torch lighter. Refer to the manufacturer’s instructions or seek professional assistance if necessary.
Tools and Techniques to Fix a Broken Torch Lighter
“If the igniter still doesn’t spark after cleaning, it might be time to replace the igniter altogether.”
If you have tried cleaning the igniter and it still isn’t sparking properly, you may need to replace it. Here are the steps to replace the igniter:
- Turn off the torch lighter and detach it from the fuel source.
- Unscrew the igniter and remove it from the lighter.
- Replace the old igniter with a new one, ensuring it is securely in place.
- Reattach the fuel source and test the lighter to ensure it works properly.
If you are uncomfortable with DIY torch lighter repair, seek professional assistance to replace the igniter.
Adjust the Flame Height
Adjusting the flame height can often help resolve the issue if your torch lighter won’t spark. Follow these steps to adjust the flame height:
- Turn the fuel adjustment valve on the bottom of the torch lighter counterclockwise until it stops. This will release the butane gas.
- Ignite the butane gas with a spark or lighter.
- Use a small screwdriver to turn the flame adjustment screw until the desired flame height is achieved.
- Turn the fuel adjustment valve clockwise to stop the butane gas.
Be cautious when adjusting the flame height, as an overly high flame can be dangerous. Always work in a well-ventilated area and use caution when working with flames.
Check the Butane Flow
If your torch lighter still won’t click after checking the fuel level, the next step is to ensure proper butane flow. Another common issue is a clogged nozzle, which can prevent the lighter from producing a flame. To troubleshoot this issue, follow these steps:
- Purge any remaining fuel from the lighter.
- Remove the nozzle cap and use a small pin to clear any debris or residue from the nozzle.
- Inspect the nozzle for any cracks or damage. If the nozzle is damaged, it will need to be replaced.
- Reassemble the lighter and try sparking it again.
If this doesn’t work, the gas valve may be clogged. To fix this issue:
- Purge any remaining fuel from the lighter.
- Remove the gas valve using a wrench or pliers.
- Soak the gas valve in rubbing alcohol for 30 minutes to dissolve debris or residue.
- Rinse the gas valve with warm water and let it dry completely.
- Reassemble the lighter and try sparking it again.
If neither of these steps resolves the issue, the butane flow control valve may be damaged or faulty. This valve controls the amount of butane flowing into the lighter and may need to be replaced to fix the issue.
Replace the Igniter
If cleaning or adjusting the flame height did not solve the problem, replacing the igniter may be necessary to fix a torch lighter that won’t produce a flame. Here’s how to do it:
- Turn off the torch lighter and let it cool down completely.
- Remove the igniter cap from the torch lighter. You may need to use a small screwdriver or pliers to remove it carefully.
- Unscrew the igniter from the torch lighter.
- Disconnect the igniter wires from the torch lighter. Be gentle to avoid damaging the wires.
- Take the new igniter and connect its wires to the torch lighter like the old igniter was connected.
- Screw the new igniter into place and put the igniter cap back on.
- Test the torch lighter by turning it on and checking if it produces a flame.
If the torch lighter still does not produce a flame, repeat the process to ensure everything is connected correctly. If the issue persists, it may be time to consider purchasing a new torch lighter.
Check for Gas Leaks
If your torch lighter still won’t ignite, gas leaks may be causing the problem. To check for gas leaks, apply a small amount of soapy water to the connections and valves of the lighter. Turn on the lighter and watch for any bubbles. If you see bubbles, it’s a sign of a gas leak.
Try tightening the connections and valves with a wrench to address gas leaks. If the leak persists, you may need to replace the faulty parts. You can purchase replacement parts online or at your local hardware store. If you’re unsure how to replace the parts, consult the manufacturer’s instructions or seek the assistance of a professional.
Inspect the O-Ring
Another potential culprit for a torch lighter that won’t click is a damaged or worn-out O-ring. The O-ring is a small rubber ring that helps seal the fuel chamber and ensures proper butane flow. Over time, the O-ring can become brittle or dry out, causing it to crack or break.
To check the O-ring, remove the fuel cap and inspect the ring for any signs of damage or wear. If you notice any cracks or breaks in the O-ring, it must be replaced.
| Tools Needed: | – New O-ring – Tweezers – Cloth for cleaning – Lubricant |
|---|
To replace the O-ring:
- Remove the old O-ring with tweezers.
- Clean the fuel chamber with a cloth to remove any debris or dust.
- Apply a small amount of lubricant to the new O-ring before installing it.
- Place the new O-ring on the fuel chamber and ensure it is fully seated.
- Replace the fuel cap and test the torch lighter.
If replacing the O-ring does not fix the issue, it may be necessary to seek professional repair services or replace the torch lighter altogether.
Test with Different Butane
If your torch lighter still won’t spark after troubleshooting and trying the previous solutions, it may be worth testing it with a different butane. In some cases, the type or brand of butane used can affect the performance of the lighter.
Try using a different brand or type of butane to see if that resolves the issue. It’s possible that the butane you’ve been using is low quality or has impurities causing the problem. You can also try using a higher quality or refined butane to see if that helps.
If testing with a different butane doesn’t resolve the issue, don’t give up hope. There are still other potential solutions that may work for your torch lighter.
Check for Other Mechanical Issues
If you have tried all the previous steps and your torch lighter is still not sparking, other mechanical issues may need to be addressed. Here are some additional steps to consider:
- Check the valve: Make sure the valve on your torch lighter is turned on and fully open. Sometimes, the valve can become partially closed, which can cause the lighter to malfunction.
- Inspect the flint to ensure it is not worn or damaged. A damaged flint can prevent your torch lighter from sparking. Replace the flint with a new one if necessary.
- Verify the piezo ignition: Make sure the piezo ignition (the part that creates the spark) is in good condition. Check for any corrosion or wear and tear that could prevent it from functioning properly. Replace the piezo ignition if necessary.
- Test the battery: Some torch lighters come with a battery-powered ignition. If yours is one of them, check the battery for enough power. A weak battery can cause the lighter to malfunction. Replace the battery if necessary.
- Seek professional repair: If none of the above steps work, your torch lighter may require professional repairs. Take it to a reputable repair shop or contact the manufacturer for assistance.
By following these additional steps, you can identify and address any other mechanical issues preventing your torch lighter from sparking.
Conclusion
In conclusion, following the expert tips and solutions provided in this article, you can troubleshoot and fix the problem.
Start by checking the fuel level and ensuring proper butane flow. If that doesn’t work, try cleaning the igniter or adjusting the flame height. If the issue persists, replacing the igniter or inspecting the O-ring for damage may be necessary.
Additionally, it’s important to check for gas leaks and other mechanical issues preventing your torch lighter from sparking.
By using different types of butane and testing your torch lighter, you may be able to resolve the issue. You might need to find perfect torch lighter that won’t easily get out of shape.
With a little patience and some troubleshooting, you can have a fully functional torch lighter once again.

I’m Alfred Davis, and I’m all about lighters. Hailing from the great state of Texas, USA, I’ve cultivated a deep passion for these fascinating gadgets. With years of hands-on experience and a burning curiosity (pun intended), I’ve become an expert in all things related to lighters.
My journey with lighters began as a hobby and quickly became a full-blown obsession. I’ve explored the diverse world of lighters inside and out, from classic Zippo designs to modern plasma arc models. I’ve tested, tinkered with, and even collected rare pieces while learning the intricate mechanics and unique histories behind each one.
Through my writing, I aim to share my knowledge, insights, and reviews to help you make informed decisions about choosing the perfect lighter. Whether you’re a seasoned collector or just looking for a reliable fire source, I’ve got you covered. Join me in unraveling the fascinating realm of lighters right here at LightersInfo, where ignition meets expertise.
Alfred Davis